Posts

Showing posts from February, 2017

Automatic 9 volt Battery Charger

Image
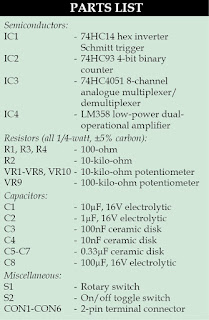
Good care given to your NiCad batteries will ensure a long life. However, they do need to be handled and charged with special care. It is therefore important to first discharge the NiCad to 1 Volt per cell, ensure that the battery is discharged, and then start the charge cycle. recommend a charge current of 1/10th the capacity for a duration of about 15 hours uninterrupted. In reality, we learn some hard lessons when we forget to switch the charger off after the 15 hours and find that one or more cells inside the battery no longer accept a charge. That is the very reason that the circuit above is fully automated. The only thing to do is connect the battery and press the 'Start' button. When the discharge cycle is finished the circuit switches over to charge for 15 hours. After the 15 hours the circuits maintains a trickle charge to keep the battery 'topped-up Before I go into the schematic details I like to explain some of the component descriptions in the schematic. Jan Ha

Classical audio power amplifier with IT and OT transformer

Image
The circuit is devote to the radio receiver in which sound ( the gear ) is weak. With the help of this tool , which initially sounds as if far to be clearly audible. Power amplifier does not require much  electrical current source , because all components are not up to over 1 Mega . But the result was incredible because it can enhance the power of  catching the wave signal. Troubleshooting : Wether transistors placement is correct ? Placement Elco ? Check are cable . If all components have benn checked , and the damaged has been replaced . Then try , turn the potentiometer slowly and listen to how the sound output by the speaker.

PWM Dimmer Motor Speed Controller

Image
This is yet another project born of necessity. It's a simple circuit, but does exactly what it's designed to do - dim LED lights or control the speed of 12V DC motors. The circuit uses PWM to regulate the effective or average current through the LED array, 12V incandescent lamp (such as a car headlight bulb) or DC motor. The only difference between the two modes of operation is the addition of a power diode for motor speed control, although a small diode should be used for dimmers too, in case long leads are used which will create an inductive back EMF when the MOSFET switches off.    Photo of Completed PWM Dimmer/Speed Control The photo shows what a completed board looks like. Dimensions are 53 x 37mm, so it's possible to install it into quite small spaces. The parts used are readily available, and many subsitiutions are available for both the MOSFET and power diode (the latter is only needed for motor speed control). The opamps should not be substituted, because the ones

The pair of transistors power amplifier

Image
Already Know about the transistor above? transistor above is one of the transistors that are applied at the amplifier end audio amplifiers. Because the power output and good quality of this transistor is very popular with high-power amplifier makers. Transistors on no other than is 2SC2922 and 2SA1216, transistor pair is already very well known as a reliable amplifier. With a price not too expensive and not too large transistor large is also very suitable. And this transistor has its own code for its quality, its code is like 5DY, 57P, 85Y, 92P, etc.. to see datsheet transistor can be seen below. Maximum Voltage  180V maximum collector current  17A Total power output  200W To more clearly and accurately datasheet can be found here.

Stable USB Power Supply Circuit Diagram

Image
A common problem when an AC mains adapter is used to power a USB device is that the voltage does not match the nominal 5 V specified by the USB standard. The circuit shown here accepts an input voltage in the range of 4-9 V and converts it into a 6-V output voltage, which is then stabilized to a clean 5-V level by a series regulator. The combined boost/buck converter used here operates on the SEPIC principle. That principle is quite similar to the operating principle of the Cuk converter, but without the disadvantage of a negative output voltage. Circuit diagram : Stable USB Power Supply Circuit Diagram The circuit is built around a MAX668, which is intended to be used as a controller for boost converters. The difference between a SEPIC converter and a standard boost (step-up) converter is that the former type has an additional capacitor (in this case C2) and a second inductor (in this case, the secondary winding of transformer L1). If C2 is replaced by a wire bridge and the secondary

A Doorbell for the Deaf

Image
This circuit provides a delayed visual indication when a door bell switch is pressed. In addition, a DPDT switch can be moved from within the house which will light a lamp in the door bell switch. The lamp can illuminate the words "Please Wait" for anyone with walking difficulties. A Doorbell for the Deaf Circuit Diagram : Notes : The circuit uses standard 2 wire doorbell cable or loudspeaker wire. In parallel with the doorbell switch, S1, is a 1N4001 diode and a 12 volt 60mA bulb. The bulb is optional, it may be useful for anyone who is slow to answer the door, all you need to do is flick a switch inside the house, and the bulb will illuminate a label saying Please Wait inside the doorbell switch or close to it. The double pole double throw switch sends the doorbell supply to the lamp, the 22 ohm resistor is there to reduce current flow, should the doorbell switch, S1 be pressed while the lamp is on. The resistor needs to be rated 10 watts, the 0.5 Amp fuse protects aga

9 Volt Power Supply Circuit Diagram Using IC 7809

Image
Description Circuit showing a 9 volt power supply . Here we have used a bridge rectifier and 7809 ic for making this circuit.Where the ic regulate the output to 9 v,1 A .This voltage every time constant.Are you interested ? Circuit diagram with Parts list.    Notes.  If a current of 300 mA or above is required, fit a proper heat sink to the IC 7809 . If 1A bridge is not available, make one using four 1N 4007 diodes.

TV Remote Control Jammer

Image
This circuit confuses the infra-red receiver in a TV. It produces a constant signal that interferes with the signal from a remote control and prevents the TV detecting a channel-change or any other command. This allows you to watch your own program without anyone changing the channel !!    The circuit is adjusted to produce a 38kHz signal. The IR diode is called an Infra-red transmitting Diode or IR emitter diode to distinguish it from a receiving diode, called an IR receiver or IR receiving diode. (A Photo diode is a receiving diode).  .  TV Remote Control Jammer Circuit Diagram There are so many IR emitters that we cannot put a generic number on the circuit to represent the type of diode. Some types include: CY85G, LD271, CQY37N (45¢), INF3850, INF3880, INF3940 (30¢). The current through the IR LED is limited to 100mA by the inclusion of the two 1N4148 diodes, as these form a constant-current arrangement when combined with the transistor and 5R6 resistor.

Regulated 24 Watt Broad Spectrum LED Lamp

Image
This project involves constructing an energy efficient broad spectrum LED lamp system. The lamp is useful for indoor reflective room lighting. It has a broad color spectrum that more closely approximates the light of the sun when compared to fluorescent bulbs and white-only LEDs. The light level is regulated and the light that is produced does not flicker. The six differently colored LED stars, made by LedEngin, Inc., are rated at 5 watts (nominal). The LED array and associated current regulator consume 1 amp at 24VDC (24 Watts). NEVER stare directly at this lamp when it is running at full operating power, it is DANGEROUSLY BRIGHT. With the LEDs shown, the combined color of the lamp has a pinkish white hue. The 5 Watt ratings of the LEDs are not precise, the white, blue and green LEDs consume about 4W and the lower voltage red, orange and deep red LEDs consume about 3W. The current regulator keeps the LED brightness constant and insures that the LED series string never draws more than

11W Stereo or 22 W Mono Power Amp Circuits

Image
Eleven W Stereo or 22 W Mono Power Amp . Integrated AF power amps have seen great improvements in recent years offering improved power and easier use. The TDA1519C from Philips contains two power amplifiers providing 11 W per channel stereo or 22 W mono when the two channels are connected in a bridge configuration. The special in-line SIL9P package outline allows the chip to be conveniently bolted to a suitable heatsink. The TDA1519CSP is the SMD version, in this case the heat sink is mounted over, and in contact with, the top surface of the chip.  11W Stereo Amplifier Circuit Diagram The operating voltage of this device is from +6V to +17.5V. The two channels of the amplifier are different in that one channel, between pins 1 and 4, is a non-inverting amplifier, while the other between pins 9 and 6 is an inverting amplifier. It is therefore necessary in stereo operation, to wire the speakers so that one of them has its polarity reversed. Each amplifier has an input impedance of 60kΩ and

Stereo preamplifier with tone control

Image
Here is the circuit diagram of an excellent stereo preamplifier with tone control using the IC TDA1524 from Phillips. The IC requires very few external components, has very low noise and has a wide power supply voltage range. POTs R1 to R4 can be used for controlling the volume, balance, bass and treble respectively. LED is D1 is a power ON indica visit page.  Stereo preamplifier with tone control   

Low Cost Calling Detector

Image
Here is simple and low-cost phone calling detector and nbsp electronic circuit Project. This electronic circuit using by powered 1.5V cell. Low-Cost Calling Detector Circuit Diagram: This circuit was designed to detect when a call is incoming in a cellular phone (even when the calling tone of the device is switched-off) by means of a flashing LED. The device must be placed a few centimeters from the cellular phone, so its sensor coil L1 can detect the field emitted by the phone receiver during an incoming call. The signal detected by the sensor coil is amplified by transistor Q1 and drives the monostable input pin of IC1. The IC's output voltage is doubled by C2 & D2 in order to drive the high-efficiency ultra-bright LED at a suitable peak-voltage. Notes: Stand-by current drawing is less than 200µA, therefore a power on/off switch is unnecessary. Sensitivity of this circuit depends on the sensor coil type. L1 can be made by winding 130 to 150 turns of 0.2 mm. enameled wire on a

60W ICs amplifier with OM961

Image
Amplifier circuit is very suitable for use in car audio speakers that use a subwoofer, with a power output of about 60W and impedance of 4 Ohm. Supply voltage ranging from 12V to 35 volts with currents +, -, and ground. If using battery then use 12V DC to DC converter which produces 3 voltage +, -, and ground. Component List : Resistor R1 = 10K R2 = 4K7 R3 = 10R R4 = 2.2R R5 = 10R R6 = 10K R7 = 680R R8 = 300R Capacitor C1 = 1uF C3 = 10uF C4 = 10uF C5 = 470uF C6 = 0.1uF C7 = 100uF C8 = 120pF C9 = 270pF C10 = 47uF IC  = OM931 , OM961

Simple Adjustable Staircase Waveform Generator

Image
Staircase signals find many applications in the field of electronics, such as in television systems, telemetry, and analogue and digital communications. Here is a circuit illustrating the basic principles of staircase waveform generator. Advantages of this circuit are: simple, low-cost, no complex programming, easy-to-assemble on a breadboard and adjustable staircase waveform outputs of variable step sizes and durations. Circuit and working The circuit diagram of a simple adjustable staircase waveform generator is shown in Fig. 1. IC1 (74HC14) is a hex inverter Schmitt trigger that generates oscillatory pulse (square wave) and gives an output clock at pin 14 of IC2 (74HC93), which is a 4-bit binary ripple counter. Pins 8, 9 and 12 of IC2 are connected to select pins of IC3 (74HC4051), which is an 8-channel analogue multiplexer/demultiplexer with three digital selected pins 9, 10 and 11. Input pins of IC3 are connected to eight potentiometers of 10-kilo-ohm each. Variable step sizes are

Using Laser Torch Intruder Detector Circuit Diagram

Image
This is the Using Laser Torch Intruder Detector Circuit Diagram. intruder detector that uses an invisible laser beam to detect the intruder. The laser beam is produced using a 3V DC or 4.5V DC laser pointer or torch that is available in the market. The 3V DC or 4.5V DC power supply for the laser transmitter can also be given using a Bridger rectifier or full-wave rectifier. Fig. 1 shows the block diagram of the complete unit comprising the transmitter and receiver sections. The laser beam from the transmitter after reflection from various mirrors (M1 through M6, as shown in Fig. 1) is made to fall on the photo detector in the receiver circuit.  Fig. 1: Block diagram of intruder detector using laser torch Once the laser beam is positioned, the receiver circuit is powered by closing switch S. An alarm unit operating on 230V AC is connected to the relay RL in the receiver circuit. When an intruder interrupts the path of the beam or switches off the laser torch, the alarm unit becomes acti

LG FLATRON W2234S SNI W2234S BNI LCD MONITOR SMPS and INVERTER SCHEMATIC

Image
Power Supply Regulator and Back-light Inverter Circuit Diagram - LG Flatron  W2234S-SNI - W2234S-BNI.Axx*QP Monitor xx * means sales region and module type (AxxIQP: INL 5ms, AxxVQP: AUO 5ms) SMPS SCHEMATIC Power Part.   This part consists of the one 3.3V, and one 1.8V regulators to convert power which is provided 5V in Power board.  16V is provided for inverter, 16V is provided for LCD panel and 5V for micom.  Also, 5V is converted 3.3V and 1.8V by regulator. Converted power is provided for IC in the main board.  The inverter converts from DC16V to AC 700Vrms and operates back-light lamps of module. INVERTER

8 Relay Control Circuit

Image
8 Relay Control Circuit R1-8=4.7 Kohms T1-8= BD139 (R1-8=15 Kohms if T1-8=BD679) RL1-8=6V-24V dc Relay D1-8=1N4148  

Fox Hunt Transmitter Circuit Diagram

Image
Simple Fox Hunt Transmitter Circuit Diagram . It is a very Simple Build a Fox Hunt Transmitter. This 2 meter 144 MHz fox hunt transmitter is used in amateur competitions where a hidden transmitter is to be “hunted” using mostly home brewed receivers and antennas. The foxhunt electronic circuit is the transmitter. It radiates a high quality signal without unwanted harmonics. Transistor T1 and the crystal together make the oscillator that generates a 36MHz signal. The unwanted 12MHz basic frequency of the oscillator is suppressed by the filter circuit made of L1, C3, C2. The L2/C4 circuit is set to the fourth harmonic or 144 MHz. The signal goes to the dual-gate-FET driver stage before finally radiating through the transmitting antenna. The output power is from 10…40mW. The radiated signal is also modulated by the gate circuit made of U1, U2, U3, U4. Gate U1 is a low frequency oscillator which generates a signal from 0.1 to 0.5Hz. This signal modulates the transmitter through the transis

Long Range FM Transmitter

Image
Long Range FM Transmitter Circuit diagram. The use of transmitters which have a more powerful output than the ‘flea-power’ are sometimes required when there are many obstacles in the path of the surveillance transmitter and monitoring station receiver, or the distance between them is too far so as to make a low powered device feasible. Whereas a typical micro transmitter will produce an RF power in the order of just a few milliwatts, i.e. a few thousandths of a watt, the VHF-FM transmitter described has a power output of between around a half and 2 watts, depending on the power source, which may be anywhere between 6 volts and 30 volts d.c. . Long Range FM Transmitter Circuit diagram : Long Range FM Transmitter Circuit diagram The battery or batteries should be of the alkaline high power type, since the current drain will be found to be relatively higher when compared to microtransmitter current drain The power output of this device is somewhat proportional to the current drain and so

Electromagnetic Relays and Selection Specifications

Image
Electromagnetic Relay acts as a electrical switch operated by electromagnet. The coil on the relay forms the electromagnet. When excited by rated voltage, it pulls the moving portion of the relay contacts towards it resulting in electrical contact. Thus it turns a load circuit ON or OFF by energizing an electromagnet, which opens or closes contact in the circuit. A relay has one coil, but may have many contacts. The contact that changes is called pole and the non-moving contacts are called ways. When the coil is off, the contact with pole is called normally closed contact. (NO) The contact established after the coil is energized is called normally open contact. (NC) The coil and the contacts of a relay are electrically galvanically isolated from each other.   Relays finds wide use in timers, interlocks circuits, trips and safety units, changeover systems etc. The main parameters required for selection of a relay are, 1. Coil rating  2. Contact rating.  3 Operation time or change over

Cheap DC Voltage Doubler

Image
This is a cheap DC Voltage Doubler Circuit diagram, which requires a few components and will deliver 10V from a 5V power supply. If the oscillator must be built from a non-functional gate then is required 2 more components: R1 and C3. The most important parameters of this voltage doubler circuit are given in the table below. Note that because of the IC tolerances these data may have some differences. Cheap DC Voltage Doubler Circuit Diagram

USB Powered Audio Power Amplifier Circuit Diagram

Image
This USB Powered Audio Power Amplifier Circuit Diagram of multimedia speakers for PCs has single-chip-based design, low-voltage power supply, compatibility with USB power, easy heat-sinking, low cost, high flexibility and wide temperature tolerance. At the heart of the circuit is IC TDA2822M. This IC is, in fact, mono-lithic type in 8-lead mini DIP package. It is intended for use as a dual audio power amplifier in battery-powered sound players. Specifications of TDA2822M are low quiescent current, low crossover distortion, supply voltage down to 1.8 volts and minimum output power of around 450 mW/channel with 4-ohm loudspeaker at 5V DC supply input.  An ideal power amplifier can be simply defined as a circuit that can deliver audio power into external loads without generating significant signal distortion and without consuming excessive quiescent current. This circuit is powered by 5V DC supply available from the USB port of the PC. When power switch S1 is flipped to ‘on’ position, 5V

3D Printed Abacus iPhone 5s Case

Image
We aren’t sure whether you know how to use the ancient calculating device, but if you just need a unique way to protect your iPhone 5/5s, the 3D printed iPhone 5s case may be suitable for you. This is an interesting form-fitting protective case that measures approx 2.4 x 5.0 x 0.5 inches, and designed for iPhone 5 and iPhone 5s. As we can see from the images, the iPhone 5 case is shaped as an abacus along with Apple logo-like beads, and all the tiny beads can be moved smoothly and freely so you can use the protective case as a real abacus. Moreover, the iPhone 5s case is made of white nylon plastic polished to reveal a smooth matte finish in order to protect your iPhone 5/5s from bumps and scratches and provide a comfortable grip. Apart from that, all iPhone buttons and ports are accessible via custom openings. The 3D printed abacus iPhone 5s case is priced at $24 USD. If you’re interested, jump to Shapeways official site for more details. Additionally, if you need other options you mi

Rolling Shutter Motor Control Circuit Diagram

Image
 Rolling Shutter Motor Control Circuit. An electrically operated rolling shutter usually has a standard control panel with a three-position switch: up, down and stop. If you would like to automate the opening and closing with a time controlled switch, a few additional wires will have to be connected. Typically, the controls are implemented as indicated in the schematic ‘Normal Situation’. If this is indeed the case, then you can see in ‘New Situation’ how the shutter can be automated with a timer. There is only one method to determine the actual schematic of your control circuit, and that is to open the control box and using an ohmmeter, pencil and paper to check out and draw the circuit. Make sure you turn the power off first though! Connect a 230-V relay (with both the contacts and the coil rated 230 VAC) to the timer.  Rolling Shutter Motor Control Circuit   The changeover switch between automatic and manual control needs to be rated 230 VAC as well and may not be a hazard for the us

Electric Motor Repair

Image
Electrical engines are a significant aspect of most large functions. They are used to make current that can be linked with a strength or to immediately petrol other systems. These engines are complicated items of professional systems and consequently it is not recommended for a individual who is not a certified fix individual to attempt to fix them. This transforms digital strength into technical strength. They come in a wide range of types and the type that you use will depend on what you need it for. The primary parts are the blades and the stator. The blades is the going aspect and the stator is the invitations aspect of it. These two items make the time frame for it. Most engines are attractive in characteristics. Both the blades and the stator generate a attractive area which makes a twisting, or demand on the powerplant base and makes the revolving of the powerplant. This is how it functions. Finding a reliable serviceman for your powerplant can be a complicated procedure. The cr

47 Watt 4 channel Audio Power Circuit Diagram

Image
Overview: The TB2903HQ is 4-ch BTL audio amplifier for car audio applications. This IC can generate higher power: POUT MAX = 47 W as it includes the pure complementary P-ch and N-ch DMOS output stage. It is designed to yield low distortion ratio for 4-ch BTL audio power amplifier, built-in standby function, muting function, and various kinds of protectors. Additionally, Off-set detector is built in.  Features  High power output  POUT MAX (1) = 47 W (typ.)  VCC = 14.4 V, f = 1 kHz, JEITA max, RL = 4 Ω)  Built-in standby switch function (pin 4)  Built-in muting function (pin 22)  Built-in Off-set detection function (pin 25)  Thermal shut down, overvoltage, out to GND, out to VCC, out to out short  Operating supply voltage: VCC (opr) = 9~18 V (RL = 4 Ω)  Circuit Diagam: 47 Watt 4-channel Audio Power Circuit Diagram Datasheet for   TB2903HQ:  Download

Whistle Responder Schematic Circuit Diagram

Image
Description Some 20 years ago it was common to see small key-holders emitting an intermittent beep for a couple of seconds after its owner whistled. These devices contained a special purpose IC and therefore were not suited to home construction. The present circuit is designed around a general purpose hex-inverter CMos IC and, using miniature components and button clock-type batteries can be enclosed in a matchbox. It is primarily a gadget, but everyone will be able to find suitable applications. Circuit operation  This device beeps intermittently for about two seconds when a person in a range of around 10 meters emits a whistle. The first two inverters contained in IC1 are used as audio amplifiers. IC1A amplifies consistently the signal picked-up by the small electret-microphone and IC1B acts as a band-pass filter, its frequency being centered at about 1.8KHz. The filter is required in order to select a specific frequency, the whistle's one, stopping other frequencies that would c

12VDC to 220V AC 500W Inverter Circuit

Image
Circuit Inverter 500 Watt 12VDC to 220VAC is made using a transistor. The basiccally of the circuit Inverter 12VDC to 220VAC 500 Watt This is a configuration of 2 pieces of transistors Q1 and Q2 which form a series of Flip-Flop. The output of the flip-flop Q1 and Q2 in the circuit Inverter 12VDC to 220VAC 500 Watt is then broken down for each pulse to complement each other using a series compiled by Q3 and Q4. Output which complement each other is then given to the driver transistors Q5 and Q6 form the transistor 2SC1061. Series Inverter Power Inverter from 12VDC to 220VAC 500 Watt This is a series of parallel transistors Q7 and Q8 are prepared and Q7x and Q8x the form of power with a type 2N3055 transistor 10 pieces. drawing a complete range of circuit Inverter 12VDC to 220VAC 500 Watts can be seen as follows. Step up part of the Circuit Inverter 12VDC to 220VAC 500 Watt 12V CT uses 12V transformer in the secondary and primary 0 - 220V. Working frequency of the Circuit Inverter 12VDC

Atv Jr Transmitter 440Mhz Circuit Diagram

Image
This low-power video transmitter is useful for R/C applications, surveillance, or amateur radio applications. Seven transistors are used in a crystal oscillator-multiplier RF power amplifier chain, and a high-level video modulator. A 9- to 14-Vdc supply is required. Output is 0.4 to 1.2 W, depending on supply voltage.  Atv Jr Transmitter 440Mhz Circuit Diagram

Counters in PLC Types of PLC Counter

Image
Counters in PLC | Types of PLC Counter   Counters count rung transitions.   The CTU runs the accumulated value of the counter up on the false to true rung transition, and the CTD instruction runs the accumulated value down.   The CTU and CTD can be used in conjunction with each other. Counters consist of the following components: ACC Accumulated Value PRE Preset Value CD Count Down Bit CU Count Up bit OV Overflow Bit UN Underflow bit By default, data file C5 stores counters, however, other counter files can be added as well. Below is how the C5 Data file would appear: For the CTU instruction:   The CU bit is high when the CTU instruction is true.   The ACC value increments by the value of 1 each time the CU bit goes high.   When the ACC   reaches the PRE, the DN bit will be set.   The CTU will continue to increment the   accumulated value until it reaches the maximum possible value for a 16 bit signed integer   (32767).   If the CU bit goes high one more time, the OV bit will be set