Posts

Electronic Thermostat and Relay

Image
Here is a simple thermostat circuit that can be used to control a relay and supply power to a small space heater through the relay contacts. The relay contacts should be rated above the current requirements for the heater. Temperature changes are detected by a (1.7K @ 70F) thermistor placed in series with a 5K potentiometer which produces about 50 millivolts per degree F at the input of the LM339 voltage comparator. The two 1K resistors connected to pin 7 set the reference voltage at half the supply voltage and the hysteresis range to about 3 degrees or 150 millivolts. The hysteresis range (temperature range where the relay engages and disengages) can be adjusted with the 10K resistor between pins 1 and 7. A higher value will narrow the range. Electronic Thermostat and Relay Circuit Diagram In operation, the series resistor is adjusted so that the relay just toggles off at the desired temperature. A three degree drop in temperature should cause the relay to toggle back on and remain on...

Minimalist Dip Meter

Image
In days gone by a radio amateur always had a dip meter close to hand in his ‘shack’. Now that people can afford oscilloscopes, the poor old dip meter has lost its importance and is  frequently no longer to be seen. Actually this is a shame because many tasks are much easier to carry out with a dip meter. Anyone who’s interested (perhaps the second time around) can easily build one rapidly with this very simple but adequate circuit. The interesting question is namely what do you actually need from a dip meter? Minimalist Dip Meter Circuit Diagram A visual display of the dip? Nope, the ‘scope can handle that task. A large frequency scale? Not necessary, as you can connect a frequency counter for this. A selection of coils? We don’t need these because we can use a jumper to change range (no coils to lose any more!). The sensor coil L1 has ten turns and is wound  using an AA-size battery as a former. This coil will allow us to over the range from 6 MHz to 30 MHz. With jumper JP1 op...

Automatic Bathroom Light with Back up Lamp Circuit Diagram

Image
Sometimes we forget to switch off the bathroom light and it remains on unnoticed for long periods. This circuit solves the problem of electricity wastage by switching off the lamp automatically after 30 minutes once it is switched on. The back-up LED lamp provided in the circuit turns on for three minutes when mains fails. This is helpful especially when you are taking a shower at night. The circuit is built around binary counter CD4060 (IC2), which has a built-in oscillator and 14 cascaded bistable multivibrators. The oscillator generates clock pulses based on the values of resistors R3 and R4 and capacitor C3. Automatic Bathroom Light with Back-up Lamp Circuit Diagram   For the given values, Q11 output of IC2 goes high after 30 minutes of power-on. Resistor R2 resets the IC for proper operation. The output of IC2 is fed to the gate of the SCR via resistor R6 and LED2, which function as a voltage dropper as well as output status indicator. When the SCR gets gate drive, it fires to...

Buck IC Boosts Battery Voltage for White LED

Image
 White-light LEDs are finding their way into many markets that incandescent bulbs once served. Flashlights are among the newer applications in which reliability, ruggedness, and ability to control the power draw of the LEDs make these devices attractive. With incandescent bulbs, the power management for the device is a simple on-off switch. However, the LEDs cannot operate directly from the two cells you typically find in most flashlights, because their required voltage is 2.8 to 4V, compared with a battery voltage of 1.8 to 3V. The power management has a further complication because the light output of the LED relates to current, and the LED's characteristics are extremely nonlinear with voltage. One approach to this problem is to boost the power supply with a current limit. A number of devices for LED applications are available; however, their current ratings are typically too low for the 1 to 5W that flashlight applications need. Buck IC Boosts Battery Voltage for White LED Circ...

Fridge Door Open Alarm Circuit Project

Image
It beeps if the fridge door is left open for too long or hasn't closed properly, to stop food from spoiling. There are lots of other uses as well. A refrigerator or freezer door that is left open or ajar may cause the food contents to spoil. In some cases, the internal temperature of the fridge or freezer will be maintained if the refrigeration system can cope with the open door. Complete project: But without the door sealing in the cold air, it may be a losing battle. Running costs will certainly rise. Typically, refrigerators and freezers are in constant use in the summer months and so it is important to ensure that the door is not open for any longer than is necessary. Otherwise the fridge or freezer will not be able to keep the contents cool. And it will cost more money to needlessly run the fridge’s compressor in a futile effort to keep the contents cool. Circuit looks like: Even the most diligent fridge user may sometimes leave the door of the fridge or freezer open without r...

Voltage Regulator 12v to 24v using 7812

Image
V oltage regulator 12v to 24v using 7812 . What many people do not know is it possible for a voltage regulator IC to provide an output voltage higher than its actual value. One method to achieve this is by connecting the "common" terminal to the middle point of a potential divider, but the problem with this method is that the regulators IC has a small quiescent current (~ 10 mA) flowing out the common terminal to ground. The circuit presented here avoids the problems of using the IC regulator to raise the voltage via the transistor Q1 to generate a low impedance to the common terminal video controller during the transfer of the voltage divider from a resistor divider network relatively high. The value of R3 is not critical, but should be low enough to accept the higher quiescent current without causing problems for T1. Voltage Regulator 12v to 24v Circuit Diagram 

40 LED Bicycle Light Circuit Diagram Using 555 IC

Image
The 555 circuit below is a flashing bicycle light powered with four C,D or AA cells (6 volts). Two sets of 20 LEDs will alternately flash at approximately 4.7 cycles per second using RC values shown (4.7K for R1, 150K for R2 and a 1uF capacitor). Time intervals for the two lamps are about 107 milliseconds (T1, upper LEDs) and 104 milliseconds (T2 lower LEDs). Two transistors are used to provide additional current beyond the 200 mA limit of the 555 timer. A single LED is placed in series with the base of the PNP transistor so that the lower 20 LEDs turn off when the 555 output goes high during the T1 time interval. The high output level of the 555 timer is 1.7 volts less than the supply voltage. 40 LED Bicycle Light Circuit Diagram   Adding the LED increases the forward voltage required for the PNP transistor to about 2.7 volts so that the 1.7 volt difference from supply to the output is insufficient to turn on the transistor. Each LED is supplied with about 20mA of current...

Discrete Virtual Ground Circuit Diagram

Image
Here is the simple virtual ground circuit based on discrete components. This simple design comes from miniaturization guru Sijosae. Is to make a buffer from generic discrete components. The transistors can be most any complementary pair of small-signal transistors. Suitable alternatives are the PN2222A and PN2907A. The diodes are generic small-signal types. An acceptable alternative is the 1N914. This circuit has better performance than a simple resistive divider virtual ground, and the parts cost is lower than for any other circuit mentioned here. It is, however, the least accurate of the buffered virtual ground circuits. Discrete Virtual Ground Circuit Diagram     Parts: R1,R2 = 4.7K R3,R4 = 4.7R C1,C2 = 470uF-25V C3,C4 = 47uF-25V D1,D2 = 1N4148 Q1 = 2SC1384 Q2 = 2SA684 B1 = Battery

Latest TDA2030 Complete Tone Control Circuit Diagram

Image
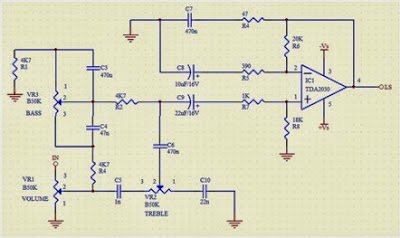
This is the Simple IC TDA2030 Complete tone Control Circuit Diagram . This circuit that use IC TDA2030, but this series is equipped with a tone control. Tone controls include Bass, Treble, and Volume. Power amplifier and tone control has been put together in a single PCB. This amplifier is a mono amplifier type, can be modify for guitar amplifiers .  If not coupled amplifier (mic preamp) then you must deactivated potensio treble and bass, why? because if not using a mic preamp and still maintain potensio treble and bass sound input (input) from the guitar will not or the maximum discharge is not tight on the speakers . So you must deactivated a way to decide which directly connected capacitor  with the tone control circuit, and capacitor were connected directly to potensio volume and input jack.   TDA2030 Complete Tone Control Circuit Diagram PCB Layout   TDA2030 Complete Tone Control Circuit Diagram PCB

Electronic Circuit Simulator Online

Image
The complaint of the majority of users when it comes to electronic circuit simulator is having to download , install and configure the program, which in most cases is a free version of a demonstration and full of limitations . What do you think of using a circuit simulator without having to download or install , and can be used from anywhere provided you have a PC and an Internet connection . This is the online editor of Circuitlab . Simply enter the site , wait to load the editor and your simulator is ready to use . If you want to save is to create a user on the site through a register . Click here and see this Electronic Circuit Simulator .  If you liked this article,Take a few Seconds to Share this and leave comments

Auto Sound Systems One Piece at a Time

Those who are in the market for auto sound systems are probably well aware of the many decisions that need to be made throughout the process. Gone are the days when you went in, pointed to a box and walked out with all the pieces, parts, and components you would ever need for a really kickin' sound. The truth of the matter is that there are many pieces and parts that work together in order to create the ultimate sound system and everyone seems to have different requirements, styles, tastes, and budgets to work with. Because of this, many manufacturers of auto sound systems have wised up to the fact that some people will buy the components they need to create the sound system of their dreams piece by piece as budgets allow. This is actually a very intelligent way for customers on a budget to buy the sound system they are hoping to some day have. As a result you will find that speakers, amplifiers, sub woofers, and the actual stereo are often sold separately and at very reasonable pr...

Project of 12 Volt Charger Circuit Diagram with LM350

Image
This is a project of Simple 12 Volt Charger Circuit Diagram with LM350.The strength supply routine structure is developed as a resource of continuous present with adverse heat range coefficient. Transistor Q1 (BD 140) is used as a heat range indicator. transistor Q2 is used to avoid the strength supply from discharging through R1 when strength is out of stock. Getting routine is developed depending on the LM350 present regulator IC. The result present of the battery charger can be altered between 13-15 V by various the POT R6.  Simple 12 Volt Charger Circuit Diagram with LM350 LM350 will try to keep the present decrease between the feedback pin and result pin at a continuous value of 1.25V. So there will be a continuous present circulation through resistor R1. Q1 act here as a heat range indicator with the help of R6/R3/R4 elements that are more or less manages the platform present of Q1. As relationship emitter / platform of transistor Q1, the same as other semiconductors, contai...

Simple Oscillator Pipe Locator

Image
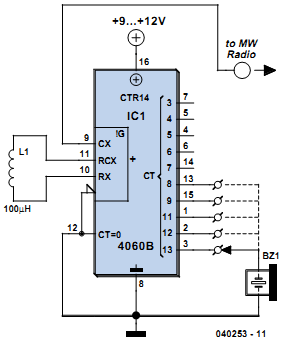
Sometimes the need arises to construct a really simple oscillator. This could hardly be simpler than the circuit shown here, which uses just three components, and offers five separate octaves, beginning around Middle C (Stage 14). Octave # 5 is missing, due to the famous (or infamous) missing Stage 11 of the 4060B IC. We might call this a Colpitts ‘L’ oscillator, without the ‘C’. Due to the reactance of the 100-µH inductor and the propagation delay of the internal oscillator, oscillation is set up around 5 MHz. When this is divided down, Stage 14 approaches the frequency of Middle C (Middle C = 261.626 Hz). Stages 13, 12, 10, and 9 provide higher octaves, with Stages 8 to 4 being in the region of ultrasound. Simple Oscillator/Pipe Locator Circuit Diagram:   If the oscillator’s output is taken to the aerial of a Medium Wave Radio, L1 may serve as the search coil of a Pipe Locator, with a range of about 50 mm. This is tuned by finding a suitable hetero-dyne (beat note) on the medium ...

Low Forward Drop Rectifier schematic

Image
A TMOS power FET , Q1 , and LM393 comparator provide a high efficiency rectifier circuit. When Va exceeds Vb1 U1's output becomes high and Q1 conducts. Conversely, when Vb exceeds Va1, the comparator output becomes low and Q1 does not conduct. The Forward drop is determined by Q1's on resistance and current I. The MTH40N05 has an ON resistance of 0.028 Ω ; for I = 10 A , the forward drop is less than 0.3V .Typically , the best Schottky diodes do not even begin conducting below a few hundred mV.

Improvised Fan Grills

Image
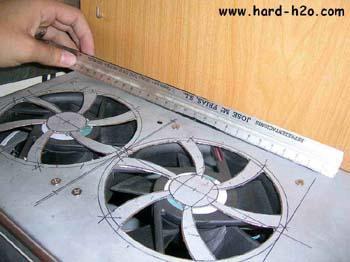
Making your own grill for your fans would be a lot easier and cheaper. You could use all materials that can be found in your home. Your main component would be your old fan, removed its metal ring and you can now measure the desired length or size of grid that you will be needed. Cut the grid across so it will be easier to cut, then place it in the tower and use the same screw you removed in the fan. Now you can put the grid holding fan back in its place. Clean up and you can now use your very own fan grills that cost almost nothing but your patience.

6803 IC Dream Color Flexible LED Tape Lights For Christmas Holiday Chris

Image

Safety Polarity Connection

Image
This electronic project prevents incorrect connection of polarized sources in circuit and is designed using common electronic components. Safety of polarity from the diagram below was dimensioned for a voltage of 12 volts. When connecting correctly voltage to terminals 1 and 2 through RE1 resting contact, diode D1 and the coil current flows once the switch closes the circuit (relay closing, established by contact or connection with device connected). Safety Polarity Connection Circuit Diagram When you connect the wrong polarity of power supply, diode D1 is blocked, the relay no longer closing and power is interrupted device. R1 resistance reduces current flowing through relay coil connected in the state, so that losses to be minimal (the resistance should be chosen according to characteristics of the relay).

Low power amplifier with IC TA7140

Image
Low power amplifier with based on the IC (intregated circuit) TA7140 manufactered by TOSHIBA , its have original output power is 0,15 Watts, and the schematic diagram is monolithic power amplifier.Though the amplifier circuit has a low output , but the maximum voltage large enough to 30 volts. Part List : Resistor     = 100R Capacitors = 4u7F , 33uF , 100uF , 1000nF , 4700nF , 47uF IC              = TA7140P Technical information : Max. Voltage = 30 V Min. Voltage = 5 V Max. Output = 1 W RL                =  150 Ohm

Basic UPS Circuit

Image
The above diagram is a basic Uninterupted Power Supply (UPS) circuit. This is a very simple and inexpensive circuit. This circuit can be adapted/modified for other regulated and unregulated voltages by using different regulators and batteries. For a 15 Volt regulated supply, you may apply two 12V batteries connected in series (it will become 24V) including a 7815 regulator (will be 15V stabilized voltage output). There is a lot of flexibility in this circuit. The capacity to keep up the regulated supply with no electrical supply relies on the load taken from the UPS and also the Ampere hour capacity of the battery. In the event that you were utilizing a 7A/h 12V battery and load from the 5V regulator was 0.5 Amp (and no load from the unregulated supply) then the regulated supply would be maintained for around 14 hours. Greater A/h capacity batterieswould give a more drawn out standby time, and the other way around.

1 5V Battery to 5V Voltage Converter Circuit Diagram

Image
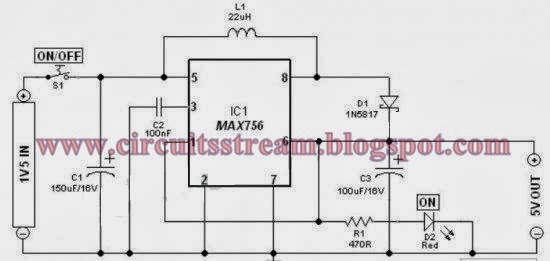
This is a Simple 1.5V Battery to 5V Voltage Converter Circuit Diagram. Stable and secure 5V DC (at 200mA max) from an ordinary 1.5V AA sized cell. At the heart of this circuit is IC1 MAX756 from Maxim, which is a CMOS step-up DC-DC switching regulator for small, low input voltage or battery-powered systems.   Simple 1.5V Battery to 5V Voltage Converter Circuit Diagram MAX756 accepts a positive input voltage down to 0.7V and converts it to a higher pin selectable output voltage of 5V (or 3.3V). Typical full-load efficiency for the this IC is greater than 87%. Max756 combine a switch-mode regulator with an N-channel MOSFET, precision voltage reference, and power-fail detector in a single monolithic device. The MOSFET is a “sense-FET” type for best efficiency, and has a very low gate threshold voltage to ensure start-up under low-battery voltage conditions (1.1V typ). The circuit can be easily wired on a very small rectangular common PCB.All connections should be kept as short as poss...