Posts

Showing posts with the label diagram

40 LED Bicycle Light Circuit Diagram Using 555 IC

Image
The 555 circuit below is a flashing bicycle light powered with four C,D or AA cells (6 volts). Two sets of 20 LEDs will alternately flash at approximately 4.7 cycles per second using RC values shown (4.7K for R1, 150K for R2 and a 1uF capacitor). Time intervals for the two lamps are about 107 milliseconds (T1, upper LEDs) and 104 milliseconds (T2 lower LEDs). Two transistors are used to provide additional current beyond the 200 mA limit of the 555 timer. A single LED is placed in series with the base of the PNP transistor so that the lower 20 LEDs turn off when the 555 output goes high during the T1 time interval. The high output level of the 555 timer is 1.7 volts less than the supply voltage. 40 LED Bicycle Light Circuit Diagram   Adding the LED increases the forward voltage required for the PNP transistor to about 2.7 volts so that the 1.7 volt difference from supply to the output is insufficient to turn on the transistor. Each LED is supplied with about 20mA of current...

Discrete Virtual Ground Circuit Diagram

Image
Here is the simple virtual ground circuit based on discrete components. This simple design comes from miniaturization guru Sijosae. Is to make a buffer from generic discrete components. The transistors can be most any complementary pair of small-signal transistors. Suitable alternatives are the PN2222A and PN2907A. The diodes are generic small-signal types. An acceptable alternative is the 1N914. This circuit has better performance than a simple resistive divider virtual ground, and the parts cost is lower than for any other circuit mentioned here. It is, however, the least accurate of the buffered virtual ground circuits. Discrete Virtual Ground Circuit Diagram     Parts: R1,R2 = 4.7K R3,R4 = 4.7R C1,C2 = 470uF-25V C3,C4 = 47uF-25V D1,D2 = 1N4148 Q1 = 2SC1384 Q2 = 2SA684 B1 = Battery

Latest TDA2030 Complete Tone Control Circuit Diagram

Image
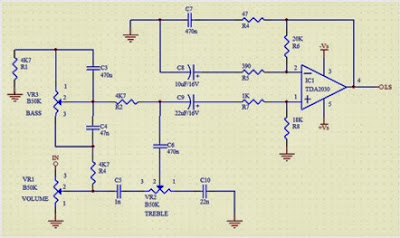
This is the Simple IC TDA2030 Complete tone Control Circuit Diagram . This circuit that use IC TDA2030, but this series is equipped with a tone control. Tone controls include Bass, Treble, and Volume. Power amplifier and tone control has been put together in a single PCB. This amplifier is a mono amplifier type, can be modify for guitar amplifiers .  If not coupled amplifier (mic preamp) then you must deactivated potensio treble and bass, why? because if not using a mic preamp and still maintain potensio treble and bass sound input (input) from the guitar will not or the maximum discharge is not tight on the speakers . So you must deactivated a way to decide which directly connected capacitor  with the tone control circuit, and capacitor were connected directly to potensio volume and input jack.   TDA2030 Complete Tone Control Circuit Diagram PCB Layout   TDA2030 Complete Tone Control Circuit Diagram PCB

1 5V Battery to 5V Voltage Converter Circuit Diagram

Image
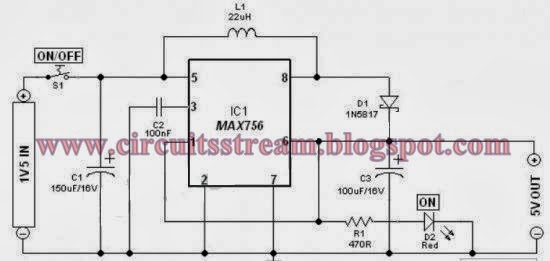
This is a Simple 1.5V Battery to 5V Voltage Converter Circuit Diagram. Stable and secure 5V DC (at 200mA max) from an ordinary 1.5V AA sized cell. At the heart of this circuit is IC1 MAX756 from Maxim, which is a CMOS step-up DC-DC switching regulator for small, low input voltage or battery-powered systems.   Simple 1.5V Battery to 5V Voltage Converter Circuit Diagram MAX756 accepts a positive input voltage down to 0.7V and converts it to a higher pin selectable output voltage of 5V (or 3.3V). Typical full-load efficiency for the this IC is greater than 87%. Max756 combine a switch-mode regulator with an N-channel MOSFET, precision voltage reference, and power-fail detector in a single monolithic device. The MOSFET is a “sense-FET” type for best efficiency, and has a very low gate threshold voltage to ensure start-up under low-battery voltage conditions (1.1V typ). The circuit can be easily wired on a very small rectangular common PCB.All connections should be kept as short as poss...

FAN 7710 Ballast Control Circuit Diagram

Image
Using the FAN 7710 Ballast Control IC for Compact Fluorescent Lamps developed using Fairchild’s unique highvoltage process and system-in-package (SiP) concept can be designed a very simple low cost fluorescent lamp driver electronic project .The FAN7710 ballast control controls internal high-voltage stress and delivers 20W to the lamp at 320VDC voltage. FAN7710 ballast control incorporates a preheating /ignition function, controlled by an user-selected external capacitor, to increase lamp life. The FAN7710 detects switch operation from after ignition-mode through an internal active Zero-Voltage Switching (ZVS) control circuit. The AC line input voltage (230 VAC 50 Hz) is rectified to provide a bus voltage of approximately 320 volts DC. Startup resistor R1 supplies initial power to the FAN7710 IC.The IC begins to oscillate and the charge pump circuit consisting of C2, D2 and D7 supplies the current to the VDD pin, which gets regulated through the internal 15-V shunt regulator.

AFX Slot Car Lap Counter Circuit Diagram

Image
Description AFX slot car sets are very enjoyable but you can increase the fun with a lap counter. This circuit will count from 00 to 99, with independent counters for each track. The sensing device used is a Hall effect sensor (UGN3503; available from Dick Smith Electronics). One of these sensors is glued under a section of each track (printed side up); between the slot and one of the track rails is the best spot. In this position, it will allow the ground effects magnets on the cars to pass over them. The sensor will provide a voltage of about 3V when a car passes over it and about 2V without a magnetic field. Circuit Diagram Both counter circuits are identical, with dual op amp IC5 handling the signals from both sensors. IC5a and IC5b are wired as comparators, with a 2.5V reference derived from zener diode ZD1 via the 10kΩ and 12kΩ resistors. Each time the output of IC5a goes high it clocks IC1a, a 4518 BCD counter. NAND gates IC2a & IC2b provide a carry out to the other half of ...

Sensor and Detector Liquids Circuit Diagram

Image
This is a very simple liquid detector which controls a relay , this gives you the option to be used for hundreds of applications . You can use it as a float switch to turn on the water pump alarm, rain, etc. . He uses a 4093 IC and transistor can be anyone, provided that it meets the power relay . This sensor can be used with Arduino no problem . Sensor and Detector Liquids Circuit Diagram

LA4440 Bridge Amplifier Circuit Diagram

Image
LA4440 is a dual channel audio amplifier IC. It can be used in two modes; one is Stereo amplifier and another Bridge amplifier mode. The LA4440 is a monolithic linear IC from Sanyo. Here I give the both circuit mode of amplifier using IC LA4440. When the IC LA4440 is in Bridge mode in the circuit, its output power is 19w. In bridge mode use 4Ω-8Ω speaker. If you want stereo output(19w+19w) in bridge mode then use two copies of amplifier circuit of given below. Resistor R3&R4 is to adjust the voltage gain and for making input signal of inverting amplifier. C10 is filter capacitor used to reduce the ripple of supply voltage. Don’t decrease the value of capacitor C6&C7 less than 100uF, 10v, it may causes of the output at low frequencies goes lower. The pin-6 of LA4440 amplifier circuit  is audio input pin; it used in stereo amplifier mode but in bridge mode it is grounded. C8&C9 are polyester film capacitor used to preventing oscillation, and R1&R2 used for the same re...

Simple Cmos Motorcycle Alarm Circuit Diagram

Image
This Simple Cmos Motorcycle Alarm Circuit Diagram features an intermittent siren output and automatic reset. It can be operated manually using a key-switch or a hidden switch; but it can also be wired to set itself automatically when you turn-off the ignition. By adding external relays you can immobilize the bike - flash the lights etc. Cmos Motorcycle Alarm Schematic Diagram Notes Any number of normally-open switches may be used. Fit "tilt" switches that close when the steering is moved or when the bike is lifted off its side-stand or pushed forward off its centre-stand. Use micro-switches to protect removable panels and the lids of panniers etc. Once activated - the rate at which the siren switches on and off is controlled by R9 & C5. For example - increasing the value of C5 will slow it down - while reducing the value of R9 will make it faster. While at least one switch remains closed the siren will sound. About thirty seconds after all of the switches have been open...

Simulated inductor Circuit Diagram

Image
This is the Simple Simulated inductor Circuit Diagram. In the this circuit With a constant current excitation, the voltage dropped across an inductance in-(in creases with frequency. Thus, an active device whose output increases with frequency can be characterized as an inductance. Simple Simulated inductor Circuit Diagram The circuit yields such a response with the effective inductance being equal to: L = R1R2C. The Q of this inductance depends upon Rl being equal to R2. At the same time, however, the positive and negative feedback paths of the amplifier are equal leading to the distinct possibility of instability at high frequencies. Rl should, therefore, always be slightly smaller than R2 to assure stable operation.

Telephone Ringing Circuit Diagram

Image
Telephone Ringing circuit Diagram . Even though cordless phones have invaded our homes and offices, you don’t always have them at hand, and as their ringtones are usually very much quieter than the old rotary-dial- type analogue phones, it can happen that you miss a call you’ve been waiting for while you’ve been going about your daily business.  Until quite recently, you could still find remote ringers that could be plugged into any standard phone socket in order to have an additional ringer, but it seems as if these accessories are currently being phased out as everyone is ‘going cordless’. So we decided to suggest something better, with this phone ring repeater that makes it possible to control any device connected to the AC power outlet using the ringtone available on any subscriber line, and naturally, with all the guarantees of safety and isolation that are of course rightly expected. So it’s capable of driving a ringer, or indeed even a high-powered sounder to alert you when ...

Build a Wideband UHF Amplifier Circuit Diagram

Image
This is the simple wide band UHF amplifier with high-performance fetes . The amplifier circuit is designed for 225 MHz center frequency, 1 dB bandwidth of 50 MHz, low input VSWR in a 75-ohm system, and 24 dB gain Three stages of U310 FETs are used in a straight forward design. Wide-band UHF Amplifier Circuit Diagram

Typical circuit diagram of Star Delta starter

Image
S0 = ‘OFF’ Push button S1 = ‘ON’ Push button K1 = Line contactor K2 = Star contactor K3 = Delta contactor K4 = Star delta timer (7PU60 20) F2 = Overload relay F1 = Backup fuse F3 = Control circuit fuse This is a starting method that reduces the starting current and starting torque. The device normally consists of three contactors, an overload relay and a timer for setting the time in the star-position (starting position). The motor must be delta connected during a normal run, in order to be able to use this starting method. The received starting current is about 30 % of the starting current during direct on line start and the starting torque is reduced to about 25 % of the torque available at a D.O.L start. This starting method only works when the application is light loaded during the start. If the motor is too heavily loaded, there will not be enough torque to accelerate the motor up to speed before switching over to the delta position. When starting up pumps and fans for example, th...

Audio Graphic Equaliser Circuit Diagram

Image
This is the Audio Graphic Equalizer Circuit Diagram. The Audio graphic equalizers are very common as commercial products (for Hi-fi, car audio and stage use) but circuits for them are very rarely published. I didn't design this one but it's really very simple. The details shown are for a 7 band but the principle can be extended to almost any number of bands - if you can find accurate enough components.  Audio Graphic Equaliser Circuit Diagram Only one gyrator stage is shown: all 7 gyrators are the same circuit, only the capacitors change, as shown in the chart. I have shown three of the seven faders to show where they go. A gyrator is a circuit using active devices and transistors to simulate an inductor. In this case the gyrator is the transistor acting with R1, R3 and C2. It could just as easily be a unity gain op-amp. The circuit includes three formulae: one which gives f, the the centre frequency of the band. The second shows how the Q is related to the capacitor ratio. T...

4 Channel Selector Stereo Audio Circuit Diagram

Image
This is the 4-Channel Selector Stereo Audio Circuit Diagram. This scheme is used for connecting stereo outputs to four different channels of inputs and only one selected for output at any time. 4-Channel Selector Stereo Audio Circuit Diagram When choosing the circuit breaker per channel (AR and AL). If there is no audio on channel A, waits scheme for some time, and then select the next channel (channel B) .The search continues until until it detects a sound in one chenal.The delay between channels or wait can be adjusted using preset VR1. If time is no longer necessary, you can replace the capacitor C1 with a higher value. Jump manually from one channel to another channel active active, simply press the jump switch (S1) to the correct input channel is selected. The selected channel (A, B, C or D), denoted by the corresponding bright LEDs (LED 11, 12, 13 or 14). IC contains 4 analog switches CD4066, these switches are connected to four channels. These analog switches control...

Contrast Control Circuit Diagram for LCDs

Image
This is a simple project of Contrast Control Circuit Diagram for LCDs. The adjustment control for the contrast of an LC-Display is typically a 10-k potentiometer. This works fine, provided that the power supply voltage is constant. If this is not the case (for example, with a battery power supply) then the potentiometer has to be repeatedly adjusted. Very awkward, in other words. The circuit described here offers a solution for this problem.  The aforementioned potentiometer is intended to maintain a constant current from the contrast connection (usually pin 3 or Vo) to ground. A popular green display with 2x16 characters ‘supplies’ about 200 µA. At a power supply voltage of 5 V there is also an additional current of 500 µA in the potentiometer itself. Not very energy efficient either. Now there is an IC, the LM334, which, with the aid of one resistor, can be made into a constant current source. The circuit presented here ensures that there is a current of 200 µA to ground, indepen...

VENN DIAGRAM MAKER

Image
Blank Venn Diagram Venn Diagram Template Using ... ... Blank Venn Diagram 3 Way ... Venn Diagram Template Using ... Venn Diagram - Free Printable ... ... (blank) Venn Diagrams, ... 3-circle-venn-diagram ... On the left side I want you to ... And Triple Venn Diagrams: In order to use a Venn Diagram ...

RF Transmitter using LM317 Circuit Diagram

Image
This is the simple RF Transmitter using LM317 Circuit Diagram . Already we saw that the LM317 has hundreds of utilities besides a voltage regulator , how in this article of a audio amplifier with the LM317 . Now that circuit the LM317 works for transmit radio waves in CW . The transmitter was done by SM0VPO and works very well , only not found the description the coil .  RF Transmitter using LM317 Circuit Diagram If you liked this article,Take a few Seconds to Share this and leave comments

Outlet Smart Bar Circuit Diagram

Image
This Outlet Smart Bar Circuit Diagram project consists of a circuit and a power strip with three or more shots to be fed only when passing current in the takeover. For example: If a soldering iron is connected to the control, the other outlets will be powered. The circuit is small enough to be incorporated into some types of commercial outlets bars. Outlet Smart Bar Circuit Diagram  List of Components R1, R2 resistors 100R 1/2W C1 100nF 630V Polyester Capacitor D1 to D6 N5408 1000V 3A Diodes D7 IC225M TRIAC 600V 8A Sensitive The types of diodes suggested in the parts list for D1 to D6 allow a power of 500W. Use BY550 diode-800 up to 800 - 1000W. For less demanding appliances, 1N4007 diodes which allows up to 200W of power. Attention! The device is connected to the power grid, so some parts of the circuit are subjected to lethal potential! Avoid touching the circuit when the power cord is connected!

1KHz Sinewave Generator Circuit Diagram

Image
Simple circuitry, low distortion, battery operated Variable, low impedance output up to 1V RMS Circuit diagram Parts: R1 5K6 1/4W Resistor R2 1K8 1/4W Resistor R3,R4 15K 1/4W Resistors R5 500R 1/2W Trimmer Cermet R6 330R 1/4W Resistor R7 470R Linear Potentiometer C1,C2 10nF 63V Polyester Capacitors C3 100µF 25V Electrolytic Capacitor C4 470nF 63V Polyester Capacitor Q1,Q2 BC238 25V 100mA NPN Transistors LP1 12V 40mA Lamp (See Notes) J1 Phono chassis Socket SW1 SPST Slider Switch B1 9V PP3 Clip for 9V PP3 Battery Circuit description: This circuit generates a good 1KHz sinewave using the inverted Wien bridge configuration (C1-R3 & C2-R4). Features a variable output, low distortion and low output impedance in order to obtain good overload capability. A small filament lamp ensures a stable long term output amplitude waveform. Useful to test the Audio Millivoltmeter, Audio Power Meter and other audio circuits published in this site. Notes: The lamp must be a low current type (12V 40-50m...