Posts

Showing posts with the label Schematic

Outdoor LED Solar Lights Circuit Schematic

Image
This Outdoor LED Solar Garden Lights project is a hobby circuit of an automatic garden light using a LDR and 6V/5W solar panel. During day time, the internal rechargeable 6 Volt SLA battery receives charging current from the connected solar panel through polarity protection diode D9 and current limiting resistor R10. If ambient light is normal, transistor T1 is reverse biased by IC1 (LM555). Here IC1 is wired as a medium current inverting line driver, switched by an encapsulated light detector (10mm LDR). Multi-turn trimpot P1 sets the detection sensitivity. When ambient light dims, transistor T1 turns on to drive the white LED string (D1-D8). Now this lamp load at the output of T1 energizes. Resistors R1-R8 limits the operating current of the LEDs. When the ambient light level restores, circuit returns to its idle state and light(s) switched off by the circuit. Circuit diagram: Outdoor Garden Solar Lights Circuit Diagram Assemble the Outdoor Solar Lights circuit on a general pur...

Philips 20 inch TFT WSXGA LCD Colour Monitor – SMPS Circuit Schematic

Image
Philips 200WB7EB/27 200WB7ES/00 200WB7ES/69 200WB7ES/75 200WB7ES/93 200WB7ES/96 200XW7EB/00 Circuit diagram Click on the schematic to zoom in

LG FLATRON W2234S SNI W2234S BNI LCD MONITOR SMPS and INVERTER SCHEMATIC

Image
Power Supply Regulator and Back-light Inverter Circuit Diagram - LG Flatron  W2234S-SNI - W2234S-BNI.Axx*QP Monitor xx * means sales region and module type (AxxIQP: INL 5ms, AxxVQP: AUO 5ms) SMPS SCHEMATIC Power Part.   This part consists of the one 3.3V, and one 1.8V regulators to convert power which is provided 5V in Power board.  16V is provided for inverter, 16V is provided for LCD panel and 5V for micom.  Also, 5V is converted 3.3V and 1.8V by regulator. Converted power is provided for IC in the main board.  The inverter converts from DC16V to AC 700Vrms and operates back-light lamps of module. INVERTER

Whistle Responder Schematic Circuit Diagram

Image
Description Some 20 years ago it was common to see small key-holders emitting an intermittent beep for a couple of seconds after its owner whistled. These devices contained a special purpose IC and therefore were not suited to home construction. The present circuit is designed around a general purpose hex-inverter CMos IC and, using miniature components and button clock-type batteries can be enclosed in a matchbox. It is primarily a gadget, but everyone will be able to find suitable applications. Circuit operation  This device beeps intermittently for about two seconds when a person in a range of around 10 meters emits a whistle. The first two inverters contained in IC1 are used as audio amplifiers. IC1A amplifies consistently the signal picked-up by the small electret-microphone and IC1B acts as a band-pass filter, its frequency being centered at about 1.8KHz. The filter is required in order to select a specific frequency, the whistle's one, stopping other frequencies that would c...

Schematic Audio Amplifier with IC AN214

Image
See this circuit below : Datasheet IC AN214 Vcc                = 6-18 V Pout               = 4,4W RL                  = 4 Ohm Ft                   = 50hz - 17Khz Icco                = 20 mA Package         = SIP2-9 Manufactered = MATSHUSHITA

LM390 power amplifier schematic

Image
Circuit schematic above is / include power amplifiers that have low power output. 1 Watt output power is only based on the IC , and ic used LM390 , manufactered by NS and ic packaged in DIP-14. For output impedance have 4 OHm. Requires a minimum voltage 4 Volt and Maximum voltage is only 9Volt. Part List : Resistor R1________33K R2________510R R3________510R R4________2.7R Capacitor C1________100uF 16V C2________100uF 16V C3________10uF   16V C4________220uF 35V C5________10uF   16V C6________100n IC IC1_______LM390  

Philips FM 23 Plasma Display Main board Schematic 1

Image
Sync selection and source selection, Video selection and matrix, Video selection ADC, Video selection decoder, VGA input, Control functions-1 & 2 Sync Selection and Source Selection Video selection and matrix Video selection ADC Video selection decoder VGA input Control functions-1 Control functions-2 Touch to see the SMPS (Power) and Audio output circuit diagram >> Click on the schematics to magnify

Schematic Audio Amplifier with IC AN374

Image
This Schematic use IC AN374, this is mono amplifier and have output speaker 1 W with impedance 8 Ohm . Supply need 8Volt to 16 Volt , this Schematic you can use current Voltage 12 V. And better use the stabilizer with 7812 let the voltage stabil. The Effect will be on the sound so smooth. See this Schematic below  and see datasheet IC AN734 : Datasheet IC AN374 Vcc                = 8-16 V Pout               = 1 W RL                  = 8 Ohm Ft                   = 50hz - 17Khz Icco                = 12 mA Package         = SIP2-10 Manufactered = MATSUSHITA

Schematic Audio Amplifier with IC AN5265

Image
Schematic Description : This Circuit Require voltage 12 -26 Volt. Good Voltage use is 16 Volt , Because its not too small and not too big Voltage. If use voltage that is to large it will quickly damage the IC. And if use voltage that is to small it will make less than maximum sound output. See this Circuit  and datsheet IC AN5265 Below : Click to Enlarge Datasheet IC  AN5265 Vcc                = 12-26 V Pout               = 2,3 W RL                  = 16 Ohm Ft                   = 40hz - 18Khz Icco                = 9,5mA Package         = SIP2-9 Manufactered =  MATSUSHITA

TV audio video transmitter Schematic Diagram

Image
This is a simple TV audio video transmitter circuit can be constructed using this schematic diagram . This TV audio video transmitter circuit can be used to transmit video signals from VCR ( or some other device ) to a TV without using any cable . Video signals input at jack J1 are first terminated by resistor R6 and coupled through capacitor C1 to clamping-diode D1. Potentiometer R3 is used to set the gain of the video signal; its effect is similar to that of the contrast control on a TV set. TV audio video transmitter Schematic Diagram Bias-control R7 can be used to adjust the black level of the picture so that some level of signal is transmitted, even for a totally dark picture. RF-transformer T1 and its internal capacitor form the tank circuit of a Hartley oscillator that's tuned to 4.5 megahertz. Audio signals input at J2 are coupled to the base of Q3 via C2 and R4: the audio signal modulates the base signal of Q3 to form an audio subcarrier that‚s 4.5-megahertz higher than t...

ZVEX Box Of Rock Point to Point Layout Schematic

Image

Schematic Audio Amplifier with IC IC AN272

Image
Description for this Schematic : Power Supply need 16 to 34 Volt , this is very beautiful voltage because with voltage 16 -34 Volt will  be strong to make a loud sound. IC need AN272 ,this ic no similarities. You must use this IC. Ouput speaker Mono , with Power 5W and Impedance 8 Ohm. Click to Enlarge Datasheet IC AN272 Vcc                = 16-34 V Pout               =5 W RL                  = 8 Ohm Ft                   = 40hz - 18Khz Icco                = 20 mA Package         = SIP2-10 Manufactered = MATSUSHITA

Schematic diagram of switching power suplly for color television circuit

Image
Schematic diagram of switching power supply for color television , which can used on a particular color TV, how it works using the switching transformer and switching transistors. At first voltage AC220V entry through the capacitor and resistor, and then immediately rectified AC voltage by 4 diodes and capacitor given on each diode. After a DC voltage then passes through a capacitor elco in parallel , and into the circuit and the voltage is lowered by the switching transformer. After the voltage is lowered and then was rectified and filtered again in the after circuit, the output voltage is set up on their own. For output +5V and +12V using ic stabilization 7805 and 7812. To use circuit switching power supply can be used on the same output voltage. If the circuit is working you should never ever touch the live area , because of the high-voltage section. And if the circuit has stopped working , do not forget to remove the voltage on the capacitor electrolyte, by linking the two legs to ...

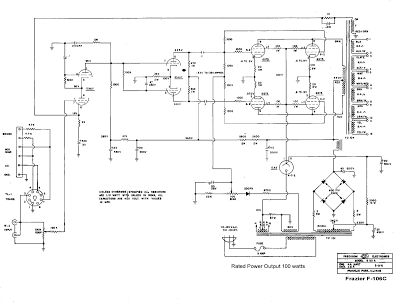
Grommes Precision Frazier G 101A F 106C 20 dBW power amplifier 4 6GT5 schematic

Image
Source : - angelfire.com/vt/audio/

Outdoor LED Solar Lights Circuit Schematic

Image
This Outdoor LED Solar Garden Lights project is a hobby circuit of an automatic garden light using a LDR and 6V/5W solar panel. During day time, the internal rechargeable 6 Volt SLA battery receives charging current from the connected solar panel through polarity protection diode D9 and current limiting resistor R10. If ambient light is normal, transistor T1 is reverse biased by IC1 (LM555). Here IC1 is wired as a medium current inverting line driver, switched by an encapsulated light detector (10mm LDR). Multi-turn trimpot P1 sets the detection sensitivity. When ambient light dims, transistor T1 turns on to drive the white LED string (D1-D8). Now this lamp load at the output of T1 energizes. Resistors R1-R8 limits the operating current of the LEDs. When the ambient light level restores, circuit returns to its idle state and light(s) switched off by the circuit. Outdoor Garden Solar Lights Circuit Diagram Assemble the Outdoor Solar Lights circuit on a general purpose PCB and enclose t...

Water Level Indicator Schematic

Image
Here’s a simple water-level indicator for overhead tanks that uses three LEDs (LED1, LED2, and LED3) to indicate minimum, middle, and maximum water levels in the tank. The sensor probes comprise A, B, C, and D, where A is the common probe and B, C, and D are meant for sensing the minimum, middle, and maximum levels, respectively. When water in the tank touches sensor wires A and B both, a small current passes from A to B through water and to the base of transistor T1 via resistor R1. As a result, transistor T1 conducts, causing LED1 to glow. Similarly, when water touches sensor C, LED2 glows to indicate that the water has reached the middle level. Finally, when water touches sensor D, LED3 glows to indicate the maximum level of water. Thus all the three LEDs glow when the tank is full. At this stage, the motor should be switched off manually. Water-Level Indicator Schematic The circuit can be easily assembled on a general-purpose PCB and enclosed in a wooden box. The three LEDs should ...

Photo Meter Assesses Ambient Light Schematic

Image
Most PN-junction diodes can be used as photodiodes. While not optimized for this application, they do work. When the diode is reverse biased, it will produce a small photovoltaic output as the light level is increased. LEDs are particularly suited for this task because their housings are transparent. You can construct a simple circuit that will assess the condition of ambient lighting and, because many LEDs’ packages are tinted to enhance their emitted color, may even yield a reasonable evaluation of the detected color. The results are not as effective as those obtained using a high-quality optical filter, which typically has narrow bandpass characteristics, but they can be quite acceptable. Though the design described here does not produce the accuracy of designs with laboratory-grade photodetectors and transimpedance amplifiers, it can be quickly assembled and will produce usable results at a low cost. Three LEDs are used; experimentation will indicate which device has the best sensi...

A Bedside Lamp Timer Circuit Schematic

Image
30 minutes operation, Blinking LED signals 6 last minutes before turn-off The purpose of this circuit is to power a lamp or other appliance for a given time (30 minutes in this case), and then to turn it off. It is useful when reading at bed by night, turning off the bedside lamp automatically in case the reader falls asleep... After turn-on by P1 pushbutton, the LED illuminates for around 25 minutes, but then it starts to blink for two minutes, stops blinking for two minutes and blinks for another two just before switching the lamp off, thus signaling that the on-time is ending. If the user want to prolong the reading, he/she can earn another half-hour of light by pushing on P1. Turning-off the lamp at user's ease is obtained by pushing on P2. Circuit diagram: A Bedside Lamp Timer Circuit Diagram Parts: Resistors R1 = 1K R2 = 4K7 R3 = 10M R4 = 1M R5 = 10K Capacitors C1 = 470µF-25V C2-C4100nF-63V Semiconductors C1 = 470µF-25V C2-C4 = 100nF-63V D1-D4 = 1N4002 D5 = 5mm. Red LED IC1 =...

Schematic Audio Amplifier with IC TDA2030

Image
This schematic is great for those of you who frequent of use IC TDA2030 . In addition to the simple schematic  is also very clear , in modification accurate enough to make a sound that is more clear, soft , and loud. And if you interest to try this schematic. See this circuit , datsheet ic TDA2030 and TDA 2040 , and IC TDA2030 equation below : Datasheet IC TDA2030 Vcc                = 6-18 V Pout               = 14 W RL                  = 4 Ohm Ft                   = 20hz - 20Khz Icco                = 40 mA Package         = TO-220 Manufactered = TELEFUNKEN Datasheet IC TDA2040 Vcc                = 3-20 V Pout               = 20 W RL               ...

Philco PH29T21D SMPS schematic

Image
Main power and System power circuit diagram SMPS circuit diagram System power circuit diagram Click on the schematics to magnify