Posts

Showing posts with the label Indicator

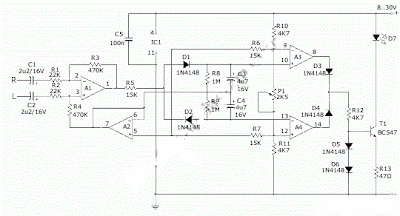
Stereo Indicator Detects L R Signal Difference
Image
This true stereo indicator is different from what we usually find on FM radio receiver, which is usually a pilot tone detector. A stereo broadcast from FM radio station contain pilot tone, but a presence of pilot tone doesn’t necessarily a stereo broadcast signal since a mono FM transmitter ca broadcast pilot tone as well.  Since this circuit detect the difference between left and right channel, this circuit can detect a real stereophonic programs.  When there is no difference between R and L input signals, the output A1 and output A2 is at the same potential. That will make a a virtual ground rail at half the supply voltage. Here is the schematic diagram of the circuit. The A1 will supply a negative or positive voltage when A1 detects a difference between R and L input signals with respect to the virtual ground rail.  The C4 will be charged via D2 an C3 via D1. The LED is turned on by the comparator A3/A4 via OR circuit D3/D4. The input signal level should be greater th...

3 Level Audio Power Indicator

Image
This circuit is designed to indicate the power level output of any audio amplifier. It's simple, portable, and displays three power levels can be adjusted to any desired value. For a standard power amplifier hi-fi stereo, the output values ​​suggested are: D5 illuminates at 2W D4 illuminates at 12.5W D3 illuminates at 24.5W The above values ​​were selected for easy setup, but other options are possible. IC1A is the input buffer, feeding 3 voltage comparators and LEDs drivers by means of a variable DC voltage obtained by R5 and C4 smoothing action. In order to achieve stability of adjustment, the supply of IC1 and trimmers R6 and R7 is reduced and is subject to 5.1V by Zener diode D1.

Simple Pencell Charge Indicator Circuit Diagram

Image
Small-size AA cells and button cells used in electronic devices providing a terminal voltage of 1.5V are normally rated at 500 mAh. As the cells discharge, their internal impedance increases to form a potential divider along with the load and the battery terminal voltage reduces. This, in turn, reduces the performance of the gadget and we are forced to replace the battery with a new one. But the same battery can be used again in some other application that requires less current. Here’s a simple tester for quick checking of discharged pencells and button cells before throwing them away. The tester detects the holding charge of the battery and the terminal voltage to indicate whether the battery is suitable for a particular gadget or not. A 9V battery can power the circuit with sufficient voltage and current. When you close switch S1, it provides stable 6V DC to the circuit. Simple Pencell Charge Indicator Circuit Diagram The circuit uses op-amp CA3140 (IC1) as a voltage comparator. It c...

Flashing LED Battery status Indicator

Image
Signals when an on-circuit battery is exhausted 5V to 12V operating voltage A Battery-status Indicator circuit can be useful, mainly to monitor portable Test-gear instruments and similar devices. LED D1 flashes to attire the user's attention, signaling that the circuit is running, so it will not be left on by mistake. The circuit generates about two LED flashes per second, but the mean current drawing will be about 200µA. Transistors Q1 and Q2 are wired as an uncommon complementary astable multivibrator: both are off 99% of the time, saturating only when the LED illuminates, thus contributing to keep very low current consumption.  Flashing-LED Battery-status Indicator Circuit Diagram The circuit will work with battery supply voltages in the 5 - 12V range and the LED flashing can be stopped at the desired battery voltage (comprised in the 4.8 - 9V value) by adjusting Trimmer R4. This range can be modified by changing R3 and/or R4 value slightly. When the battery voltage approaches...

Temperature warning indicator circuit

Image
The circuit is a low temperature regulator, supervisor, warns us about global warming. Temperature control is done by the thermistor TH1, which is a negative factor. The resistance varies between 10KO at 25 ° C and about 1KO at 94 ° C. The trimmer TR1 regulate the exact temperature at which the Q1-2, connected as a Darlington, lead me, making the relay K1 to close and IZ, sound. The alarm is activated when the temperature is greater than the default. The thermistor should be located away from the rest of the circuit, so as not to risk from the heat. The power circuit is battery 9V, but if it is mounted in a fixed position, then we can supply with a constant voltage power supply. The relay contacts can be connected load which we, as a bulb, another circuit, etc. It can also add an LED, if we are to sign and visual stimulation. The adjustment is done by immersing the thermistor TH1, in the water which we know the temperature (contacts should be well insulated so we do not have s...

Mains Interruption Counter with Indicator Circuit Diagram

Image
This circuit counts mains supply interruptions (up to 9) and shows the number on a 7-segment display. It is highly useful for automobile battery chargers. Based on the number of mains interruptions, the user can extend the charging time for lead-acid batteries. Mains Interruption Counter Circuit Diagram Fig. 1 shows the circuit of the interruption counter with indicator. A 9V (PP3 or 6F22) battery powers the entire circuit. Fig. 2 shows the block diagram of the mains interruption counter circuit along with the battery charger and lead-acid battery as used in automobile battery charger shops.When 9V is applied to the circuit, IC2 is reset by the power-on-reset signal provided by capacitor C3 and resistor R5 and the 7-segment display (DIS1) shows ‘0.’ The 230V AC mains is fed to mains-voltage detection optocoupler IC MCT2E (IC1) via capacitor C1 and resistors R1 and R2 followed by bridge rectifier BR1, smoothing capacitor C2 and current-limiting resistor R2. Illumination of the LED insid...

Audio Clipping Indicator

Image
Detects clipping in preamp stages, mixers, amplifiers etc., Single LED display - 9V Battery supply unit This circuit was intended to be used as a separate, portable unit, to signal by means of a LED when the output wave form of a particular audio stage is "clipping" i.e. is reaching the onset of its maximum permitted peak-to-peak voltage value before an overload is occurring. This will help the operator in preventing severe, audible distortion to be generated through the audio equipment chain.  This unit is particularly useful in signaling overload of the input stages in mixers, PA or musical instruments amplification chains, but is also suited to power amplifiers. A careful setting of Trimmer R5 will allow triggering of the LED with a wide range of peak-to-peak input voltages, in order to suit different requirements. Unfortunately, an oscilloscope and a sine wave frequency generator are required to accurately setup this circuit. Obviously, the unit can be embedded into an ex...

Simple Multidoor Opening Alarm with Indicator

Image
This door-opening alarm alerts you of intruders . You can use it for up to three doors. You simply need to fit a small unit including reed switch on each doorframe and fix a magnet on the moving door such that the magnet aligns with the reed switch when the door is closed. A separate unit incorporating the power supply, three LEDs and a buzzer is to be kept by your side inside your room. A three-core ribbon cable from this unit goes to each door unit. One core goes to the positive terminal, second to the negative terminal and third to the output of the unit. When the door is closed, the reed switch terminals are shorted and the alarm does not sound.  Multidoor Opening Alarm with Indicator Circuit Diagram When door 1 is opened by someone, transistors in the corresponding door unit conduct and the buzzer sounds. LED1 glows to indicate opening of door 1. Due to diode latching action, the alarm will sound continuously even after the door is closed. It can be stopped only by pressing th...

Car Battery Voltmeter with LED Indicator

Image
The circuit was developed to create a voltmeter that will be used to test car batteries while showing an indication using LEDs. Voltmeter – a device or an instrument used for measuring the electrical potential difference between two points of either alternating current or direct current electric circuit. LM324 – has internal frequency compensated for unity gain, large DC voltage gain, wide bandwidth, wide power supply range, very low supply current drain, low input biasing current, low input offset voltage, large output voltage swing and differential input voltage range equal to the power supply voltage. The voltage of a car battery can be measured with the use of a voltmeter as well as the charge left. A typical car battery voltage delivers around 12.6 V under no load condition and will require charging if the voltage reading is at 11.6 V. The measurement of voltage is best recommended during a high current like running the car head lights into high beam. In case the battery rapidly d...

Temperature warning indicator circuit

Image
The circuit is a low temperature regulator, supervisor, warns us about global warming. Temperature control is done by the thermistor TH1, which is a negative factor. The resistance varies between 10KO at 25 ° C and about 1KO at 94 ° C. The trimmer TR1 regulate the exact temperature at which the Q1-2, connected as a Darlington, lead me, making the relay K1 to close and IZ, sound. The alarm is activated when the temperature is greater than the default. The thermistor should be located away from the rest of the circuit, so as not to risk from the heat. The power circuit is battery 9V, but if it is mounted in a fixed position, then we can supply with a constant voltage power supply. The relay contacts can be connected load which we, as a bulb, another circuit, etc. It can also add an LED, if we are to sign and visual stimulation. The adjustment is done by immersing the thermistor TH1, in the water which we know the temperature (contacts should be well insulated so we do not have short circ...

Water Level Indicator Schematic

Image
Here’s a simple water-level indicator for overhead tanks that uses three LEDs (LED1, LED2, and LED3) to indicate minimum, middle, and maximum water levels in the tank. The sensor probes comprise A, B, C, and D, where A is the common probe and B, C, and D are meant for sensing the minimum, middle, and maximum levels, respectively. When water in the tank touches sensor wires A and B both, a small current passes from A to B through water and to the base of transistor T1 via resistor R1. As a result, transistor T1 conducts, causing LED1 to glow. Similarly, when water touches sensor C, LED2 glows to indicate that the water has reached the middle level. Finally, when water touches sensor D, LED3 glows to indicate the maximum level of water. Thus all the three LEDs glow when the tank is full. At this stage, the motor should be switched off manually. Water-Level Indicator Schematic The circuit can be easily assembled on a general-purpose PCB and enclosed in a wooden box. The three LEDs should ...

Yes No Indicator Has Zero Standby Current

Image
This circuit produces a random "Yes" or "No" with a single button press - indicated by the illumination of a red or green LED. The circuit has two advantages over similar circuits. First, it uses just a single momentary contact pushbutton, so no on-off switch is required. When the pushbutton is pressed, an oscillator comprising the 10nF capacitor and 22kΩ resistor at pins 1 & 2 is almost immediately stopped by FET Q1, which pulls the oscillator's timing capacitor to the positive rail. However, the 220nF capacitor and 470kΩ resistor in the gate circuit of Q1 introduce a tenth of a second's delay, so that about 250 oscillations take place before the clock is stopped. Due to variations in charge on the circuit's capacitors, as well as voltage and temperature variations, and the unpredictability of when the pushbutton will be pressed, randomness is assured. The circuit has a high degree of randomness because it takes advantage of a near-perfect compleme...

Brake Failure Indicator

Image
Here is a brake failure indicator circuit that constantly monitors the condition of the brake and gives an audio-visual indication. When the brake is applied, the green LED blinks and the piezobuzzer beeps for around one second if the brake system is intact. If the brake fails, the red LED glows and the buzzer stops beeping. The circuit will work only in vehicles with negative grounding. It also gives an indication of brake switch failure. In hydraulic brake systems of vehicles, a brake switch is mounted on the brake cylinder to operate the rear brake lamps. Brake Failure Indicator Circuit Diagram: The brake switch is fluidoperated and doesn’t function if the fluid pressure drops due to leakage. The fluid leakage cannot be detected easily unless there is a severe pressure drop in the brake pedal. This circuit senses the chance of a brake failure by monitoring the brake switch and reminds you of the condition of the brake every time the brake is applied. The circuit uses an op-amp IC C...

Numeric Water Level Indicator Circuit Diagram

Image
Most water-level indicators for water tanks are based upon the number of LEDs that glow to indicate the corresponding level of water in the container. Here we present a digital version of the water-level indicator. It uses a 7-segment display to show the water level in numeric form from'0' to '9.' The circuit works off 5V regulated power supply. It is built around priority encoder IC 74HC147 (IC1), BCD-to-7-segment decoder IC CD4511 (IC2), 7-segment display LTS543 (DIS1) and a few discrete components. Due to high input impedance, IC1 senses water in the container from its nine input terminals. The inputs are connected to +5V via 560-kilo-ohm resistors. The ground terminal of the sensor must be kept at the bottom of the container (tank). IC 74HC147 has nine active-low inputs and converts the active input into active-low BCD output. The input L-9 has the highest priority. The outputs of IC1 (A, B, C and D) are fed to IC2 via transistors T1 through T4. This logic inverter ...

Fuse Failure Indicator Circuit Diagram

Image
Mains/Fuse Failure Indicator Circuit Diagram. The indicator shows when the mains is present at its output by a continuous glow of a neon bulb, La1, and when the fuse is blown by flashing of the neon bulb. When the fuse is intact, capacitor C2 acts as the series resistance for the neon bulb, so that this glows continuously. When the fuse has blow, the mains voltage across diode D1 is applied as a pulsating direct voltage to network R1-C1. Capacitor C1 charges slowly and when the voltage across it reaches 80–100 V, the neon bulb comes on. Capacitor C1 is then discharged slowly via diode D2 and the bulb. Mains/Fuse Failure Indicator Circuit Diagram When the voltage across it has dropped sufficiently, the bulb goes out, whereupon C1 slowly charges again. This process repeats itself, so that, provided the values of R1 and C1 are right, the bulb flashes visibly. The potential across capacitor C2 is a ramp with a peak value of 30 V (which is, of course, applied to the load). Note that the neo...

Project of Clipping Indicator For Audio Amplifiers

Image
This is a Project of Clipping Indicator For Audio Amplifiers circuit Diagram. A clipping indicator is a useful accessory on any audio amplifier . It indicates when the amplifier has reached its limit and is clipping the peaks of the audio signal. In practice, quite a lot of clipping can occur before you can hear it. So why is it necessary to know when an amplifier is clipping if you can't notice it? The answer is that clipping "squares up" the waveform and square waves contain lots of higher-frequency harmonics which can easily damage the tweeters in loudspeaker systems. This circuit is a true clipping indicator as opposed to the level indicators that are commonly used in preamplifier stages. The problem with level indicators is that an amplifier's maximum output power is not constant. That's because the amplifier's supply rails are not regulated and so the maximum power available at any given instant varies, depending on the applied signal. The circuit is qu...

Remote Audio Level Indicator

Image
The normal level-indicator circuits which are available in the market require connections to be made to the output of the player, which may not be easily accessible. The audio level indicator circuit described here removes this restriction as it may be placed close to the player’s speakers and yet the desired effect can be realised. Circuit diagram : Remote Audio Level Indicator Circuit Diagram As shown in the circuit, signals are picked up by the condenser microphone, which get further amplified by the noninverting amplifier built around one of the four op-amps of LM324. The remaining three, along with four op-amps of the second LM324, are used as seven comparators to work as the level detector, giving seven output levels through seven coloured LEDs. The sensitivity of the audio level indicator circuit may be improved by varying the 220k potentiometer. If a fine adjustment is desired, a 4.7-kilohm potentiometer may be connected in series resistors with the 220k potentiometer. C...

Indicator light using Windows Comparison Circuit Diagram

Image
This circuit indicator light level using operational amplifier , LDR and indiction is by LEDs . There are a variety of LDR , its resistance varies from less than 100 ohms on a cloudy day in more than one megohm in complete darkness. A trimmer 2K was used to adjust the range of comparison. This configuration can also be used to indicate   the reconnoiter .    Indicator light using Windows Comparison Circuit Diagram